Modelling Geometry
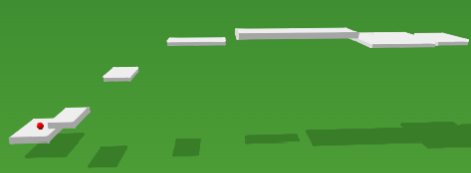
Normally modelling a game scene could take a while but in ChromeEngine it's super Easy! Once again here's the scene we're going to be making:

It has a start and end platform, 5 in between platforms, two spikes and an enemy.
In ChromeEngine, all code for modelling the scene should be placed in the aptly named sprite Setup within the custom block setup scene objects . We're going to do all our modelling via code which is nice and easy for our simple platformer, however we recommend you use 3D modelling software like Blender for bigger game scenes as it'll make your life a lot easier. To see how to do that go here
First add a player#
The first step in any ChromeEngine project should be to make sure you have a player as otherwise we won't be able to play the game! If you're using the blank ChromeEngine project then by default we create a player object. If you don't have one then in the setup scene objects custom block add the following
GameObjects.createPlayer \( position [0] [1] [0] first person view? <> Fixed shadow? <not <>>\) :: custom
This sets our players initial position to be 0,1,0 (aka 1 unit above the origin) and tells ChromeEngine that we want our player to have a shadow which stays at a fixed distance. The fixed distance shadow is important when making a platformer, as otherwise ChromeEngine will project the shadow onto the ground plane, which won't look very good.
Coordinate System in ChromeEngine#
The coordinate system used by ChromeEngine is based on the system used by OpenGL. It is a right-handed system, which means that:
- The x-axis goes from left (negative values) to right (positive values).
- The y-axis goes from bottom (negative values) to top (positive values).
- The z-axis goes from far (negative values) to near (positive values).

This is important to understand when setting positions of your game objects.
Making the platforms with createCuboid#
We're going to try to make some platforms which match the drawing at the top of this page. For this we're going to use the createCuboid block:
GameObjects.createCuboid \(Scale [ ] [ ] [ ] Position [ ] [ ] [ ] Rotation [ ] [ ] [ ] Material [ ] name [ ]\) :: custom
This lets us specify Scale, Position, material and a name for our objects. ChromeEngine doesn't have a visual scene modelling environment, so to find the right Scale and Position values for our platforms we use trial and error. (For more complex scenes we recommend you model your scene in Blender, which you can learn how to do with our Blender Modelling tutorial)
It is important that you give each platform a name that you can remember because you'll be using it again later. We'll name our platforms: Start, Platform 2, Platform 3, Platform 4, Platform 5, Platform 6, End.
We encourage you to try and see if you can make these platforms on your own, but if you get stuck you can just copy the below code:
GameObjects.createCuboid \(Scale [2] [0.2] [2] Position [0] [0] [0] Rotation [ ] [ ] [ ] Material [] name [Start]\) :: custom
GameObjects.createCuboid \(Scale [1.6] [0.2] [1.2] Position [1.2] [1.4] [-2.5] Rotation [ ] [ ] [ ] Material [] name [Platform 2]\) :: custom
GameObjects.createCuboid \(Scale [1.2] [0.2] [1.2] Position [0.6] [3.6] [-5.2] Rotation [ ] [ ] [ ] Material [] name [Platform 3]\) :: custom
GameObjects.createCuboid \(Scale [0.5] [0.2] [3] Position [0] [5.2] [-9.2] Rotation [ ] [ ] [ ] Material [] name [Platform 4]\) :: custom
GameObjects.createCuboid \(Scale [1.3] [0.2] [6.4] Position [0] [5.6] [-14.6] Rotation [ ] [ ] [ ] Material [] name [Platform 5]\) :: custom
GameObjects.createCuboid \(Scale [2.4] [0.2] [3.4] Position [0] [5.2] [-20] Rotation [ ] [ ] [ ] Material [] name [Platform 6]\) :: custom
GameObjects.createCuboid \(Scale [1.3] [0.2] [6.4] Position [0] [5.6] [-14.6] Rotation [ ] [ ] [ ] Material [] name [End]\) :: custom
Now when we click play we get our first look at our 3D platformer!
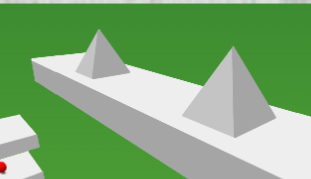
Modelling the spikes using createCone#
For our spikes, we'll use a cone mesh, with 4 sides. In ChromeEngine to add a cone shaped GameObject we use the GameObjects.createCone block:
GameObjects.createCone \(Radius [] Height [] Number of sides [] Position [ ] [ ] [ ] Rotation [ ] [ ] [ ] Material [ ] name [ ]\) :: custom
To make our spikes we'll use two of these each with Radius 0.2, height 0.3 and 4 sides. Make sure that your cones are positioned above the platformer and don't intersect with it.
GameObjects.createCone \(Radius [0.2] Height [0.3] Number of sides [4] Position [0] [5.3] [-8.6] Rotation [ ] [ ] [ ] Material [] name [Spike 1]\) :: custom
GameObjects.createCone \(Radius [0.2] Height [0.3] Number of sides [4] Position [0] [5.3] [-9.8] Rotation [ ] [ ] [ ] Material [] name [Spike 2]\) :: custom
Here's what our spikes should look like:
Modelling our Enemy#
Modelling the enemies body using createCuboid#
For our enemies body we'll once again use the GameObjects.createCuboid block:
GameObjects.createCuboid \(Scale [0.4] [0.4] [0.4] Position [0] [5.6] [-20] Rotation [ ] [ ] [ ] Material [] name [Enemy]\) :: custom
Giving our enemy an eye using create3DPoint#
Our Enemy's a little boring at the moment so lets bring it to life by giving it an eye! We can do this easily in ChromeEngine using 3D points which are points in 3D space either rendered as a dot with pen or as a stamped image. For now we'll just render it as a pen dot, but in the next section we'll make it look a lot better using a stamped image material.
We can create a 3D point for the eye using the GameObjects.create3DPoint block:
GameObjects.create3DPoint \(material name [] radius [0.2] scale y [] position [0] [0] [-0.3] parent [enemy] shadow offset dist [] name [Eye]) :: custom
To make sure our Eye is always at a fixed offset from the Enemy body we parent it to the Enemy and specify the position as an offset of 0, 0, -0.3 rather than a global coordinate.
Here's what our finished enemy should look like:

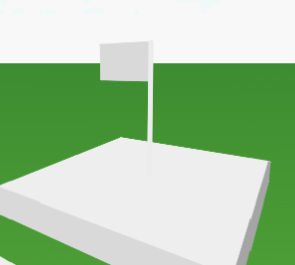
Modelling the flag#
Modelling the flag pole using create3DLine#
Our flag pole is a vertical cylinder of height 0.9. In ChromeEngine to improve the performance we use 3D lines instead of cylinders. To make a 3D line we use the GameObjects.create3DLine block. Here's how we can use it to make a flag pole in the centre of our final platform:
GameObjects.create3DLine \(Pt A [0] [5.2] [-23] Pt B [0] [6.4] [-23] material [] radius [0.02] parent [] name [Flag Pole]\) :: custom
Points A and B are the end points of our 3D line and Radius is half the thickness of it.
Modelling the flag fabric using createTri/Quad#
On top of our flag pole we want a single green rectangle for the flag fabric. To make a single triangle or quad in ChromeEngine you can use the createTri/Quad block. Here's how it can be used for to make the flag fabric:
GameObjects.createTri/Quad \(Pt A [0] [6.1] [-23] Pt B [0] [6.4] [-23] Pt C [-0.5] [6.4] [-23] Pt D \(leave blank if tri\) [-0.5] [6.1] [-23] parent [Flag Pole] material [] name [Flag Fabric]\) :: custom
Finally here's our finished flag!
Moving the ground down#
As of currently the ground feels a little high up; we want our player to have some room to fall! We can move the ground by changing the @ground_y variable which controls the ground height setting. Add the following to the start of setup:
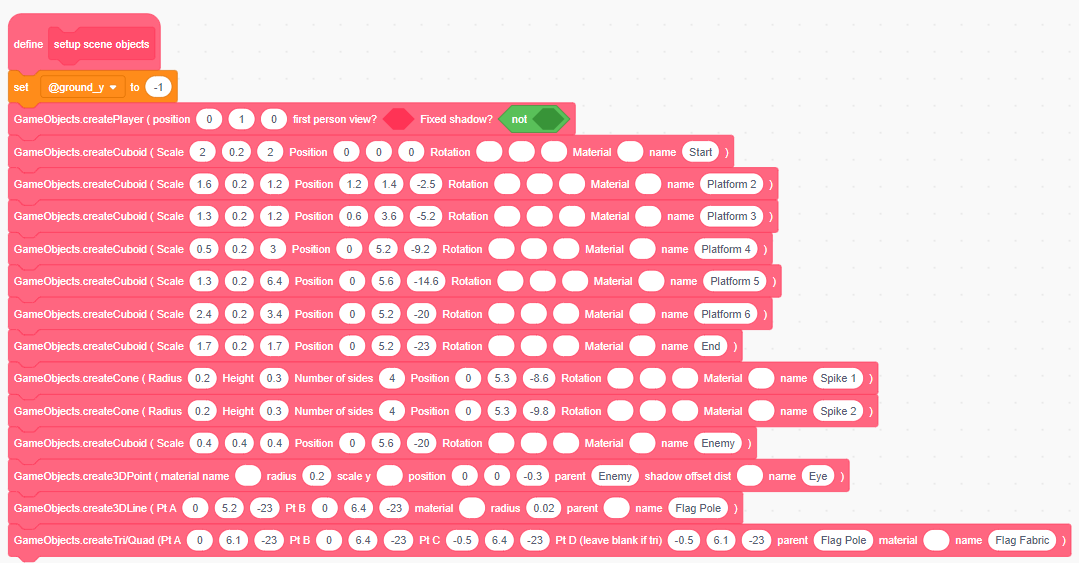
set [@ground_y v] to [-1]
Wrapping up and Additional Resources#
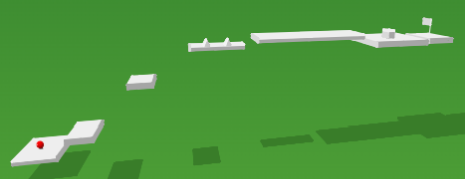
Congratulations! If you did all the steps correctly, you should now have something that looks a bit like this when you click the green flag:
Here's the finished code you should have after completing this stage of the tutorial.
For more detailed information on setting up the scene in ChromeEngine, you can visit Modelling in our documentation.
In the next part of this tutorial, we'll add movement and interaction to our game! Keep learning, and happy coding!